
Don't Drop The Cake Chapter 5 final chase walkthrough
Clear the house, factory and ski chase, then activate the red T-handled detonator outside the cabin after the giant arrives. Follow the rewind and memory scenes to the daughter and complete the cake delivery. The exterior device is pictured below.
On this page+
Finale spoilers: This guide covers Until the Very Last Moment in the released full game, not the Demo or Prologue. For the meaning of the ending after you finish, open the story explanation.
Stuck at another scene? Use puzzle solutions and quick fixes to find the next action and failure checks.
Find your current section
The links below open the relevant moment in BENG's complete run. They are video positions, not a time limit or an estimate of how long your attempt should take.
| What is on your screen? | Your next objective | Footage |
|---|---|---|
| Red house corridors and the flower creature | Follow the forward route and move into the open gap before each obstacle. | Chapter 5 start — 1:41:25 |
| Factory with monitors along the sides | Line up with the narrow lane and the lit exit. | Factory lane — 1:44:30 |
| Snow, flags, barrels and humanoid obstacles | Steer through the marked route toward the cabin sequence. | Ski hazards — 1:45:30 |
| Nokiwa waiting ahead on the snow bridge | Continue the plan and let the scripted encounter play out. | Bridge encounter — 1:46:40 |
| Explosives inside the wooden cabin | Go to the exterior red T-handled detonator once the giant has arrived. | Detonator approach — 1:47:24 |
1. House chase: clear the gap before correcting the cake
The chapter returns to the red house, but the urgent chase changes how you use its corridors. The forward-moving section calls for lateral dodges: choose the clear side of the next obstruction early, then use a small mouse correction to settle the tray. Trying to dodge, turn and drag the mouse widely at once makes it harder to tell whether the next failure was a collision or a cake drop.
Treat the flower creature, furniture and narrow openings as route hazards. Keep your attention on the next gap rather than looking back at the pursuer. A Chapter 1 habit of searching rooms and locking doors does not help with this forward chase; continue through the opening in front of you.
If the same passage repeatedly defeats you, use one attempt to identify where the obstruction enters your path. On the retry, start the dodge earlier and reduce the number of corrections. This is a practice method, not a fixed left/right input script: the useful cue is the open space visible in your current attempt.
2. Factory: take the lane between the monitors
The industrial section reuses the factory setting as part of the final route. When small monitors appear along both sides, look down the central lane toward the opening beyond them. Align before entering the narrow stretch; a late wide correction can carry you off the usable path.
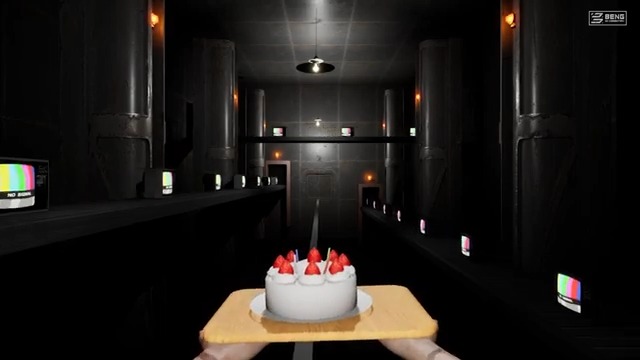
Follow the open passage and lit door into the next environment. If you came here looking for a face-button order, that is the earlier Chapter 2 factory puzzle; the monitor-lined finale section is a traversal problem. Separating those two scenes avoids repeating a puzzle solution at the wrong point in the game.
3. Ski route: set up each flag passage early
The snow descent combines the flag route with obstacles such as barrels and humanoid figures. Use the next pair of flags to establish your line, then steer into an unobstructed gap before reaching the obstacle. Keep looking one hazard ahead so that clearing one object does not leave you aimed directly at the next.
For retries, distinguish the two common mistakes: hitting a hazard calls for an earlier route adjustment; losing the cake on an otherwise clear line calls for smaller mouse corrections. Repeating the same large dodge for both problems can make the second one worse. The general ski and snowfield guide explains the earlier chapter's flag sections and clock-monster rule.
The route eventually reaches Nokiwa on a snow bridge. In the reviewed run, the giant's encounter with him is followed by a fade and the cabin sequence. Let that transition finish; use the location you regain control in to choose the next step.
4. Cabin: find and activate the red detonator
If you are at the explosive-filled cabin, the key object is outside, beside the wooden wall. The red explosive containers identify the trap; the separate red T-handled plunger is the device that advances it.
- Follow the cabin sequence after the bridge encounter. You can see the explosives through the doorway or window.
- Once the giant creature is standing outside, move along the exterior wall to the red upright device. Use the wall and nearby rock as landmarks rather than searching among the containers.
- Face the T-shaped handle on top of the red base and activate it with your interaction binding. The footage establishes the object and sequence; follow your game's displayed prompt for the input, especially with a remapped or Steam Deck layout.
- The explosion, bright transition and pale corridor in the successful run show that the finale has advanced. Continue into the following scenes.
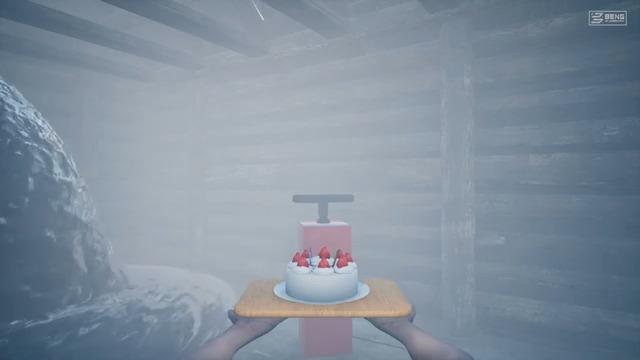
If you can see the explosives but nothing progresses, return outside and locate this device. Repeatedly approaching the containers misses the actionable object. If the giant has not arrived yet, continue the encounter sequence rather than treating the cabin as a free-exploration room.
5. After the rewind: finish the delivery
The detonation leads into the rewind and memory scenes, then returns the story to the daughter and the birthday cake. Follow the conversation and interaction prompts to complete the delivery. A change to a pale corridor or a memory scene is progress beyond the chase, not a reason to restart it.
For gameplay, your remaining task is to follow those scenes through to the closing sequence. The daughter's restored form, Nokiwa's part in the plan and the father's return are discussed separately in ending explained, so you can finish first and read the interpretation afterwards.
Retry according to what actually failed
| Failure | Change on the next attempt |
|---|---|
| Collide in the house | Pick the visible gap earlier; keep your view directed along the route. |
| Fall at the monitor-lined factory section | Align with the narrow lane before entering it; avoid a wide last-second correction. |
| Hit a ski obstacle | Use the next flag pair to plan an earlier line around it. |
| Cake falls after a successful dodge | Reduce the mouse correction and settle the tray between hazards. |
| Reach the cabin but cannot advance | Find the red exterior detonator after the giant arrives. |
You can lower Difficulty from the pause menu and resume practising the current section. The official description says Super Easy keeps the cake still unless you move the mouse; avoid unnecessary mouse movement while learning the obstacle route. Version 1.02 fixed cake tilt in some Super Easy sections. See difficulty and checkpoint behaviour and official patch notes before changing your retry plan around older footage.
Evidence and review date
Reviewed on October 2, 2026. Scene order, the factory lane and the exterior detonator were checked against BENG's complete released-game run, published September 10, and compared with Ziggy The Adventurer's Chapter 5 footage, published August 31. The two images are attributed frames from BENG's video; they are not developer screenshots or our own play session.
Difficulty behaviour and the published Version 1.02 change come from the official Steam page and Midoriyama's announcements. Route observations, our retry recommendations and story interpretation serve different purposes: the footage documents landmarks and progression; the retry advice explains how to approach the next attempt. No frame establishes a universal enemy timer, custom controller preset or exact checkpoint location.
Continue exploring
Related guides
Don't Drop The Cake Guides: Puzzle Solutions & Fixes
Stuck in Don't Drop The Cake? Find factory button solutions, cage lever checks, clock monster rules, ski controls, cabin detonators and final chase fixes.
Don't Drop The Cake Beginner Guide: Controls & First Steps
Start Don't Drop The Cake with the real controls, a first-run difficulty choice, checkpoint habits, five-chapter expectations, and version advice.
Don't Drop The Cake: Demo, Prologue and Full Game
Compare the Don't Drop The Cake Demo, Prologue and full game by Steam app, release date, scope and save-carryover notice. Avoid following the wrong route.
Don't Drop The Cake Controls & Cake Balancing Guide
Don't Drop The Cake controls and balancing guide for WASD, mouse corrections, corners, chases, conveyors and ski sections, with fixes for common cake drops.