
Chapter 4 walkthrough: mannequin lights, corridor buttons and escape
Advance toward the mannequin while its head is turned away, stop when it faces you with glowing eyes, then press the red button below its head. After the next memory scene, search the arrow-marked corridors for wall buttons, use the six-light gate to check progress, and continue through the escape and reunion scenes to Chapter 5.
On this page+
Stuck at another scene? Use puzzle solutions and quick fixes to find the next action and failure checks.
Choose the obstacle on your screen
| What you can see | What to do next | Video position |
|---|---|---|
| Family memory followed by grey corridors | Let the dialogue finish, then follow the lit passage and red arrows. | Chapter 4 begins — 1:11:16 |
| Mannequin head between eight coloured lamps | Approach in stop-and-go stages and reach the pedestal's red button. | Light challenge — 1:16:30 |
| Television with Nokiwa's symbol | Advance the memory dialogue until the corridor returns. | Television scene — 1:18:40 |
| Grey corridor, red arrows and wall plates | Enter side passages and activate their buttons. | Corridor search — 1:21:00 |
| Barred gate with green and red indicators | A red light means the circuit is unfinished; check remaining side passages. | Gate check — 1:24:20 |
| Arms along the walls, then Nokiwa ahead | Follow the escape route and continue when he calls you away. | Escape sequence — 1:29:00 |
This guide covers At Betrayal's End in the full game. It reveals progression cues but leaves the detailed story interpretation to the ending explanation. Video positions are scene locators, not a time limit.
1. Continue through the opening memories
After Nokiwa's betrayal, the Chapter 4 title leads into a family conversation. Once the scene returns control to you, follow the grey passage under the hanging bulbs. Red arrows on the walls show turns at junctions; approach the next doorway rather than searching the living-room scene for a hidden inventory object.
A later conversation with the police officer leads into the large dark hall. The important landmark there is the head on a pedestal, with four coloured lamps on either side. That is your next playable obstacle.
2. Mannequin light puzzle: watch the head, then press the button
The room uses a stop-and-go challenge, sometimes described as a red-light/green-light puzzle. Its visible signal is more specific: the head turns, its eyes glow when facing you, and the row of coloured lamps fills. A red bulb is one member of that row, so do not use “a red light exists” as the whole stopping rule.
- Face the pedestal from the open aisle. Before advancing, identify the next clear stretch between the pillars and furniture.
- Move while the head faces away. Use a short advance so you can stop before the next turn.
- Stop as it turns toward you and the eyes light up. Leave the mouse still during the stop, too; settle the tray before the end of your movement window.
- Repeat until you can reach the red button on the pedestal beneath the head. Interact when you are in range and the movement window lets you finish the approach.
- After activating it, use the door immediately beside the pedestal to continue to the television memory.
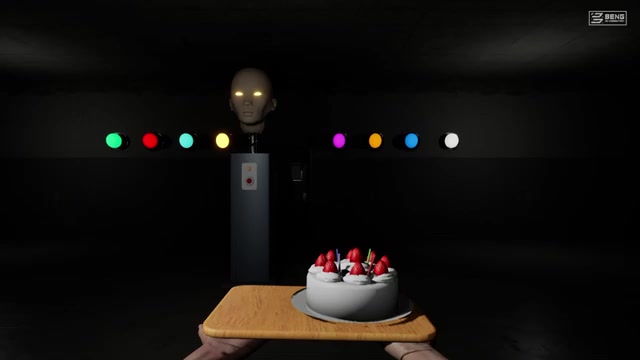
If you keep being caught near the end: take one more stop instead of trying to finish the whole remaining distance in a single movement window. Use the head's orientation as the repeatable cue, not the recording's elapsed seconds. If furniture blocks your approach, change your line during the away-facing phase rather than correcting sideways while the head watches.
3. Find the corridor buttons and check the six-light gate
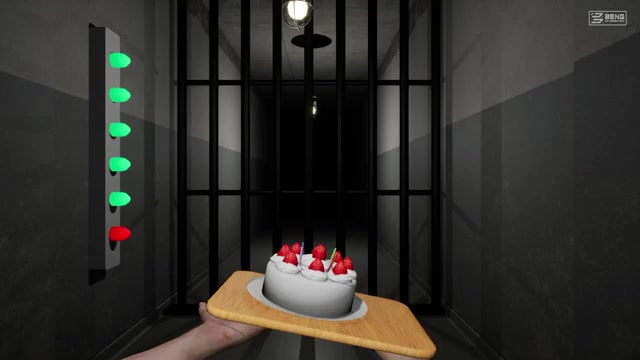
After the television scene, you return to grey corridors. Your new target is a barred gate with a vertical strip of six indicators, not the mannequin's horizontal eight-colour row. The small red wall buttons control this section's progress.
Use this loop to search without losing track:
- At a red-arrow junction, inspect the side passage before continuing down the main corridor. Small green markings can also appear near the turn; use the corridor geometry and visible wall plates to identify the branch.
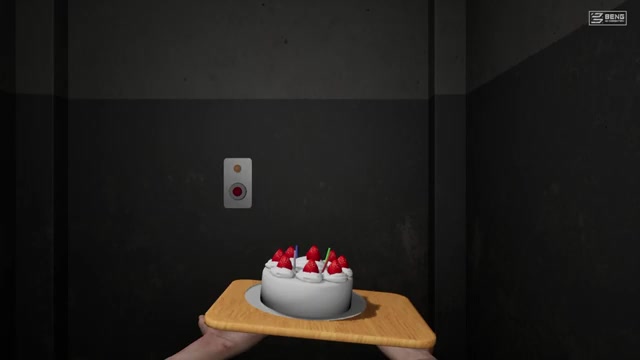
- Follow the branch to its far wall. Look for a white plate holding a red button and a small lamp; approach and press E.
- Confirm the local lamp turns green. Turn around and return to the junction you just left, then choose the next unchecked passage.
- Revisit the gate to read the remaining lights. Five green and one red still means one interaction is missing. Search the unchecked branch rather than waiting at the bars.
- Once the route opens, continue into the larger hall toward the next encounter and slime scene.
| Landmark for finding your place again | What to check | Footage |
|---|---|---|
| Red right-pointing arrow beside a small green wall marking | Check the side passage at this junction; its wall plate is under a hanging bulb. | Junction and button — 1:21:18 |
| Long corridor with an open door and lit wall beyond | Continue through the doorway and inspect the wall plate at the end. | Later corridor button — 1:23:30 |
| Bars beside a vertical light strip | Count the remaining red indicators before choosing another branch. | Five green, one red — 1:24:20 |
On a failed attempt, inspect the lamps in the restored scene before repeating your route. Checking a local button is quicker than assuming every earlier interaction either persisted or reset. Keep turns controlled around doorways: a creature encounter and a cake drop call for different retry adjustments.
4. Finish the memories and escape with Nokiwa
The slime encounter leads to another television conversation. Continue its dialogue, including the contract sequence, until the game returns to the corridor with arms along the walls. Follow the open passage to Nokiwa. When the escape instruction appears, turn into the available route and keep moving rather than waiting beside him.
The following sequence changes viewpoints and includes Nokiwa's recollection, the bright field and further memories. Let those scenes progress. Chapter 5: Until the Very Last Moment begins back in the red house; use the final chase walkthrough when that title appears.
Fast fixes for repeat failures
| Problem | Change on the next attempt |
|---|---|
| Caught during the mannequin approach | Stop on the head-turn and glowing-eye cue earlier; shorten the next advance. |
| Reached the head but nothing progresses | Move into interaction range of the red pedestal button, activate it, then take the adjacent door. |
| Gate stays closed after several buttons | Read the six-light strip and check unvisited side passages; entering a branch is not the same as pressing its button. |
| Cake falls during a safe corridor turn | Stabilise before turning, then move into the next straight. See cake-balancing controls. |
| Still at the television | Continue the current dialogue until the memory ends and the corridor returns. |
Sources and review
Prepared by Don't Drop The Cake Wiki, reviewed October 13, 2026. The head-and-lamp states, pedestal button, corridor plates, gate indicators and chapter transition were checked in BENG's Chapter 4 recording. The broad scene order and light-room layout were also compared with Ziggy The Adventurer's Chapter 4. Screenshots are attributed BENG video frames. Short movement windows and the branch-checking method are our editorial retry recommendations, not measured timing guarantees or a claimed independent playtest.
For the whole route, return to the five-chapter walkthrough. Send corrections with your chapter, difficulty and screenshot to the wiki's corrections address.
Continue exploring
Related guides
Don't Drop The Cake Guides: Puzzle Solutions & Fixes
Stuck in Don't Drop The Cake? Find factory button solutions, cage lever checks, clock monster rules, ski controls, cabin detonators and final chase fixes.
Don't Drop The Cake Beginner Guide: Controls & First Steps
Start Don't Drop The Cake with the real controls, a first-run difficulty choice, checkpoint habits, five-chapter expectations, and version advice.
Don't Drop The Cake: Demo, Prologue and Full Game
Compare the Don't Drop The Cake Demo, Prologue and full game by Steam app, release date, scope and save-carryover notice. Avoid following the wrong route.
Don't Drop The Cake Controls & Cake Balancing Guide
Don't Drop The Cake controls and balancing guide for WASD, mouse corrections, corners, chases, conveyors and ski sections, with fixes for common cake drops.