
Chapter 2 factory: face buttons, conveyor and cage lever
Read the four faces on the wall from left to right and press their matching buttons. Later, survive the conveyor countdown, use lockers during the factory creature's pursuit, then light all six indicators and pull the separate lever to release the caged worker.
On this page+
Stuck at another scene? Use puzzle solutions and quick fixes to find the next action and failure checks.
Find your factory roadblock
These links open positions in BENG's released-game recording. The times locate a scene; they are not deadlines for your attempt.
| What is on your screen? | What to do next | Footage |
|---|---|---|
| Four face drawings and a right-pointing arrow | Read the wall clue left to right; match each face to a wall button. | Face room — 17:25 |
| Moving belt with a large countdown | Keep moving against the belt and dodge incoming crates and barrels. | Conveyor — 21:20 |
| Pale creature, green wall arrows and blue lockers | Locate the next button and a nearby locker before advancing. | Pursuit area — 27:00 |
| Caged slime, six lights and a lever | Finish the wall-button circuit, then pull the lever once the lights are green. | Rescue console — 30:34 |
Face-button puzzle: use the wall's four-face order
Squeezed-shut eyes → round-eyed smile → angled eyebrows with a straight mouth → closed curved eyes. Match the drawings beneath the buttons in that order. The enlarged strip below shows the reviewed wall clue; compare it with the arrow and faces in your room before starting.
Match the four faces in this order
- 1Squeezed-shut eyes, smiling mouth
- 2Round eyes, smiling mouth
- 3Angled eyebrows, straight mouth
- 4Closed curved eyes, small mouth
The answer key is a row of four green face drawings beneath an arrow pointing right. The room's separate pushbuttons each have a face drawn beneath them. This is a wall sequence to match, so start by finding that row rather than treating the lamp above a button as the next face instruction.
- Read the four drawings left to right, in the arrow's direction. Compare eye and mouth shapes rather than assigning vague names such as “happy.”
- Find the button with the first matching drawing underneath it and interact with it.
- Return to the wall clue for the next face and press its matching button. Continue through the four positions in order.
- Watch the indicators and exit. The recording shows lamps turning green as inputs are accepted; completing the sequence opens the door near the slime worker.
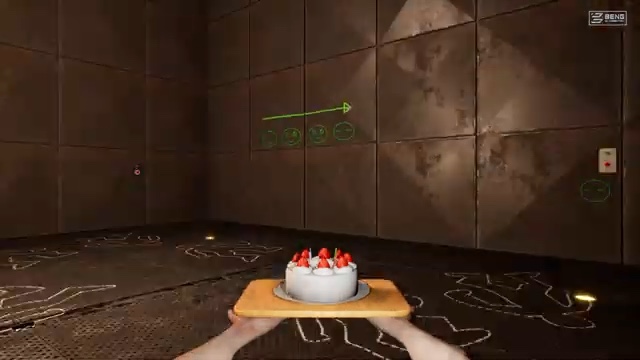
Ceiling spikes descend while the puzzle is active. Before committing to the inputs, identify where each matching button is; wandering between guesses uses the available space and time. After a failed attempt, reread the wall and check the lamps. If the door remains shut, compare the face you selected with the next position in the clue before repeating the entire sequence.
Conveyor countdown: survive until the hacking cue
This timed section is earlier than the caged-worker rescue. Its screen counts down while the belt carries you toward danger. Nokiwa tells you to run, and crates and barrels obstruct the usable lane.
Keep moving against the belt's travel, then make short lateral adjustments into the next clear gap. Read the obstacle approaching you before it fills the foreground; trying to recover from both belt drift and a collision at the last moment also makes cake control harder. Settle the cake between dodges instead of making one large mouse correction during a turn.
In the reviewed run, the counter reaches zero, the screen changes to Nokiwa's symbol with a hacking message, and a red alarm/fire sequence follows. Zero is the cue to watch for the next event, rather than proof that you failed a rescue. Follow the route revealed by that sequence instead of continuing to run in place after the escape opens.
Version 1.01 adjusted the conveyor stage's difficulty. The developer did not publish a universal movement duration or describe every difficulty's timer; use the current screen and obstacle gaps to guide your attempt.
Presses and spikes: line up before entering
For a moving machine between you and the next platform, observe its travel from safe floor first. Face the landing, cross during the visible opening, and stabilise after reaching the next safe patch. This separates two failures: being struck by the machine calls for a different entry time; losing the cake after clearing it calls for a smaller mouse correction.
Pale creature: use wall arrows, buttons and lockers
Nokiwa describes this enemy as fast and half-blind. Blue metal lockers, green arrows and wall pushbuttons are the landmarks to follow through its area. Its limited sight does not make standing in its route safe.
Identify a locker before going toward the next wall button. If pursuit begins, enter the reachable locker using the interaction prompt and wait for the creature to pass before resuming. Use the arrows to reorient after leaving cover, then find the next uncompleted button. If you lose track of progress, return to the rescue console and read its indicators rather than inventing a fixed left/right hallway route.
Caged worker: six green lights, then the lever
At the rescue platform, the worker is behind bars. A vertical column of six indicator lights stands on the left; the lever is a separate upright panel on the right, with its own green lamp.
- Complete the remaining wall-button interactions in the surrounding corridors, using the lockers when needed.
- Return to the cage and check the six-light column. In the successful recording, all six lights and the lamp above the lever are green before activation.
- Interact with the right-hand lever. The cage rises and the slime walks out; follow the worker toward the exit.
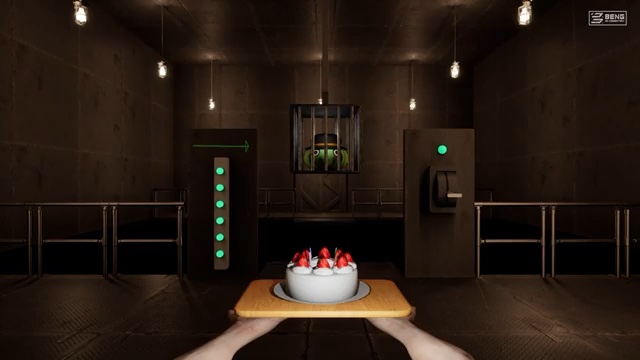
If the cage stays closed, check unfinished lamps and the lever panel before retracing the whole chapter. After a death, inspect the current light state so you know which local interactions still need doing. This console is a readiness check; the conveyor's earlier countdown is a different obstacle.
Retry help and sources
October 13, 2026: face clue rechecked. The numbered enlargement uses the original face drawings from BENG’s puzzle sequence around 17:40–18:30. Eye and mouth shapes were compared with the button drawings. The conveyor and rescue review below remains dated October 2, 2026.
For repeated cake drops on a correctly chosen route, use cake-balancing controls or change Difficulty from the pause menu. The official store description says Super Easy keeps the cake still unless you move the mouse; Version 1.02 fixed unintended tilt in some sections on that setting.
Reviewed October 2, 2026, using BENG's released-game Chapter 2 footage and the official notices linked above. The two images are attributed video frames, not our own play session. Wall clues, lamps and scene order are footage observations; the alignment and retry advice is this wiki's editorial guidance. Continue with the Chapter 3 snowfield walkthrough after leaving the factory.
Continue exploring
Related guides
Don't Drop The Cake Guides: Puzzle Solutions & Fixes
Stuck in Don't Drop The Cake? Find factory button solutions, cage lever checks, clock monster rules, ski controls, cabin detonators and final chase fixes.
Don't Drop The Cake Beginner Guide: Controls & First Steps
Start Don't Drop The Cake with the real controls, a first-run difficulty choice, checkpoint habits, five-chapter expectations, and version advice.
Don't Drop The Cake: Demo, Prologue and Full Game
Compare the Don't Drop The Cake Demo, Prologue and full game by Steam app, release date, scope and save-carryover notice. Avoid following the wrong route.
Don't Drop The Cake Controls & Cake Balancing Guide
Don't Drop The Cake controls and balancing guide for WASD, mouse corrections, corners, chases, conveyors and ski sections, with fixes for common cake drops.