
Chapter 1 walkthrough: flower monster, six buttons and elevator
Enter the right-hand room when the flower monster appears, shut and lock the door with F, then activate the six room buttons. Check the six green lights at the barred exit, follow the red corridor, turn back when the giant hand blocks it, and take Nokiwa's escape passage to the green elevator.
On this page+
Stuck at another scene? Use puzzle solutions and quick fixes to find the next action and failure checks.
Find the part blocking your escape
| Your current obstacle | Next action | Video position |
|---|---|---|
| Flower monster in the dark hallway | Enter the room on the right and lock its door before searching. | First encounter — 2:20 |
| Missing a room button | Match your room to the six-room checklist below. | Button search — 2:50 |
| Barred passage with a vertical light strip | Check for six green lights, then go into the red corridor. | Exit check — 8:20 |
| Giant hand fills the corridor | Turn back on the warning, then take the newly opened metal passage. | Escape turn — 8:50 |
| Green elevator has stopped | Let the conversation finish; continue through the metal corridor when the door opens. | Elevator — 9:20 |
Video times locate BENG's full-game scenes; your own attempt can take longer or shorter.
1. Cross the opening house and use the first safe room
Follow the red-walled hallway to the rocky gap. Line up with the narrow red crossing before moving across; use the doorway on the opposite side as your aiming point. After the next door, the scene changes to a dark corridor and the flower-headed creature approaches.
Take the room on your right as the on-screen instruction appears. Move completely inside, face the door and use F: Lock. The prompt distinguishes this from E: Interact: opening a door and securing it are separate actions. Secure the room before turning toward the wall button.
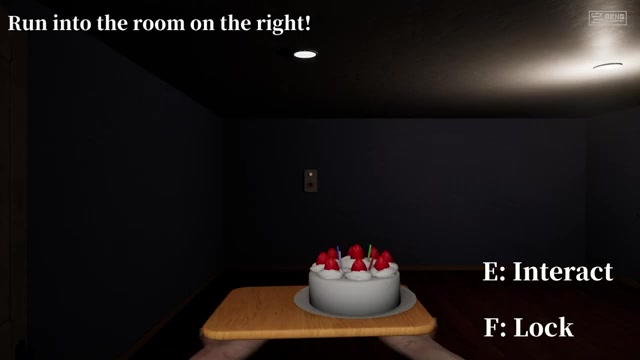
If you are caught while entering, begin the right turn earlier instead of backing away along the corridor. If the cake falls during that turn, separate the doorway movement from a large mouse correction. The cake-control guide explains how to reduce overcorrection.
2. Find the six house buttons by room landmark
Look for a small wall plate with a red pushbutton and a lamp above it. Move close enough to interact and press E. Use the lamp turning green as your completion check. The table follows the rooms visited in the recording; it is a search checklist, not a code that must be entered in that order.
| Room landmark | Where to look | Video position |
|---|---|---|
| First blue-walled refuge on the right | On the plain blue wall inside the room where the lock tutorial takes place. | First button — 3:00 |
| Dining room with a round table, mugs and large flowers | Turn from the table toward the wall near the shelving. The plate is above table height. | Dining-room button — 3:41 |
| Bedroom with a bed and low drawers | Check the pale wall beside the tall plant; secure the door before approaching it. | Bedroom button — 4:30 |
| Overgrown room with bushes and a large dark-red flower | Look through the foliage at the far pale wall, next to the flower. | Overgrown-room button — 5:10 |
| Office with two desk rows and tall white daisies | Walk around the desks to the far wall. The button is to the left of the wall-mounted black screen. | Office button — 6:20 |
| Flower room with a bright green floor | Look at the blue wall under the ceiling light, above the low flowers. | Green-floor room — 8:00 |
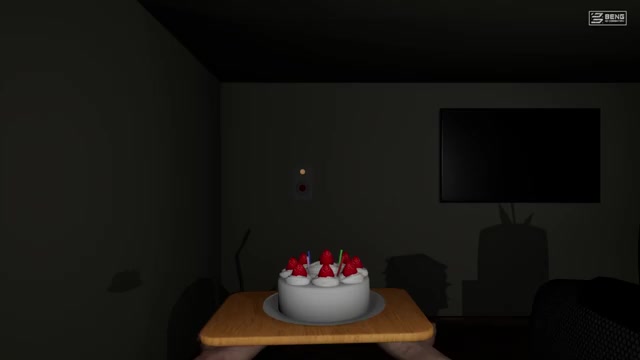
Between rooms, use the corridor's red arrows and picture frames to keep your bearings. When the pursuer is near, use a reachable room and its lock prompt before continuing the search. Check the button lamp before leaving so a room you merely entered is not mistaken for a completed room.
3. Open the six-light exit and escape the hand
Return to the barred corridor and inspect the vertical strip of six lights beside the opening. In the completed search, all six are green and the way forward is open. If the way is still blocked, use the room checklist to identify a missed interaction; the six lights summarize progress, while each room's own lamp lets you check that room directly.
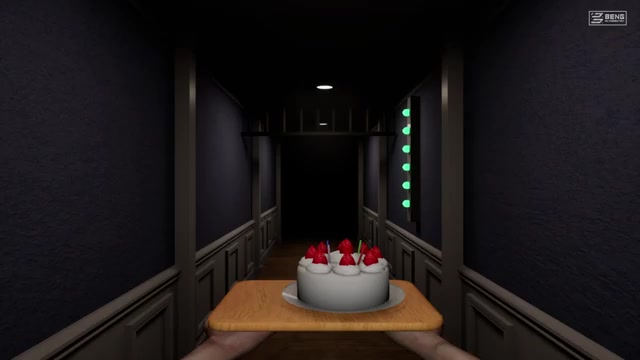
Follow the red corridor until the giant hand blocks the route and the game tells you to run back. Turn around and retreat. Nokiwa announces an escape route; follow the opening into the metal-walled passage, then go straight to the green elevator. This turn-back cue belongs to the hand sequence: it is different from the earlier flower-monster instruction to enter a room on the right.
4. Continue after the green elevator
Stay in the elevator for the conversation. When its door opens, continue along the metal corridor toward the small green slime. Follow the subsequent escape cue through the green-lit doorway into the industrial area. The slime rescue scene and the descending passage lead to the Chapter 2: Factory and Strife title card.
If you have already reached the elevator, the six-button house search is behind you. Your next route guide is Chapter 2: factory buttons, conveyor and cage rescue.
Retry checklist
- Caught at the first flower encounter: enter the right-hand room immediately, then face and lock the door.
- Lost among similar hallways: identify the room by its furniture, check its lamp, and leave by the same doorway before choosing the next branch.
- Exit still barred: compare the six-room checklist with the lamps you actually activated. After a restart, read the current lamp states before repeating the entire route.
- Cake drops while escaping the hand: turn on safe floor, line up with the retreat corridor, then move. Avoid combining the turn with a large mouse movement.
- Balance alone prevents progress: the official Steam description says the easiest mode keeps the cake still unless you move the mouse. See difficulty and checkpoints.
Sources and review
Prepared by Don't Drop The Cake Wiki, reviewed October 13, 2026. Room landmarks, button positions, prompts and the elevator transition were checked against scenes in BENG's released-game Chapter 1. Images are attributed frames from that recording. Route instructions describe those observations; the retry checklist is our editorial advice, not a claim of an independently played test run.
Return to the five-chapter walkthrough for the whole route. Found a mismatched landmark? Send the chapter, difficulty and a screenshot to the wiki's corrections address.
Continue exploring
Related guides
Don't Drop The Cake Guides: Puzzle Solutions & Fixes
Stuck in Don't Drop The Cake? Find factory button solutions, cage lever checks, clock monster rules, ski controls, cabin detonators and final chase fixes.
Don't Drop The Cake Beginner Guide: Controls & First Steps
Start Don't Drop The Cake with the real controls, a first-run difficulty choice, checkpoint habits, five-chapter expectations, and version advice.
Don't Drop The Cake: Demo, Prologue and Full Game
Compare the Don't Drop The Cake Demo, Prologue and full game by Steam app, release date, scope and save-carryover notice. Avoid following the wrong route.
Don't Drop The Cake Controls & Cake Balancing Guide
Don't Drop The Cake controls and balancing guide for WASD, mouse corrections, corners, chases, conveyors and ski sections, with fixes for common cake drops.